Attack of the Delta Clones (Against Disaster Recovery Availability Complexity)
by Itai Weiss and Denny Lee
Get an early preview of O'Reilly's new ebook for the step-by-step guidance you need to start using Delta Lake.
Notebook: Using Deep Clone for Disaster Recovery with Delta Lake on Databricks
For most businesses, the creation of a business continuity plan is crucial to ensure vital services, such as data stores, remain online in the event of a disaster, emergency or other issue. For many, it is mission critical that data teams can still use the Databricks platform even in the rare case of a regional cloud outage, whether caused by a disaster like a hurricane or some other unforeseen event. As noted in the Azure and AWS disaster recovery guides, Databricks is often a core part of an overall data ecosystem, including, but not limited to, upstream data ingestion, sophisticated data pipelines, cloud-native storage, machine learning and artificial intelligence, business intelligence and orchestration. Some use cases might be particularly sensitive to a regional service-wide outage.
Disaster recovery - the tools, policies and procedures in place to recover or ensure continuity of your data infrastructure - is a crucial component of any business continuity plan. Delta clones simplify data replication, enabling you to develop an effective recovery strategy for your Delta tables. Using Delta clones allows you to quickly and easily incrementally synchronize data in the correct order between your primary and secondary sites or regions. Delta uses its transaction log to perform this synchronization, analogous to how RDBMS replication relies on its logs to restore or recover the database to a stable version. While solutions such as cloud multi-region synchronization may solve some problems, these processes are typically asynchronous, resulting in operations being performed out of order and data corruption.
This article shows how Delta clones can avoid these issues and facilitate DR by controlling the process of data synchronization between data centers.
What are clones again?
Naturally, the first question is: what are clones?
Clones are replicas of a source table at a given point in time. They have the same metadata as the source table: the same schema, constraints, column descriptions, statistics and partitioning. Note, however, that clones have a separate, independent history from the source table. For example, time travel queries on your source table and clone may not return the same result.
A shallow (also known as zero-copy) clone only duplicates the metadata of the table being cloned; the data files of the table itself are not copied. Because this type of cloning does not create another physical copy of the data, the storage costs are minimal. Shallow clones are not resource-intensive and can be extremely fast to create. However, these clones are not self-contained and maintain a dependency on the source from which they were cloned. Shallow clones are beneficial for testing and experimentation – such as for staging structural changes against your production table without actually modifying it. For more information, refer to Easily Clone your Delta Lake for Testing, Sharing, and ML Reproducibility.
A deep clone makes a full copy of the metadata and data files of the table being cloned. In that sense, it is similar to copying with a CTAS command (CREATE TABLE... AS... SELECT...). However, it’s simpler because it makes a faithful copy of the current version of the original table at that point in time, and you don’t need to re-specify partitioning options, constraints and other information as you have to do with CTAS. In addition, it’s much faster, more robust and can work in an incremental manner. This last point is critical in that it enables an efficient solution to replicate only the data that is required to protect against failures, instead of all of the data.
Deep clones are useful for:
- Testing in a production environment without risking production data processes and affecting users
- Staging major changes to a production table
- Ensuring reproducibility of ML results
- Data migration, sharing and/or archiving
In this article, we’ll be focusing on the role of Delta deep clones in disaster recovery.
Show me the clones!
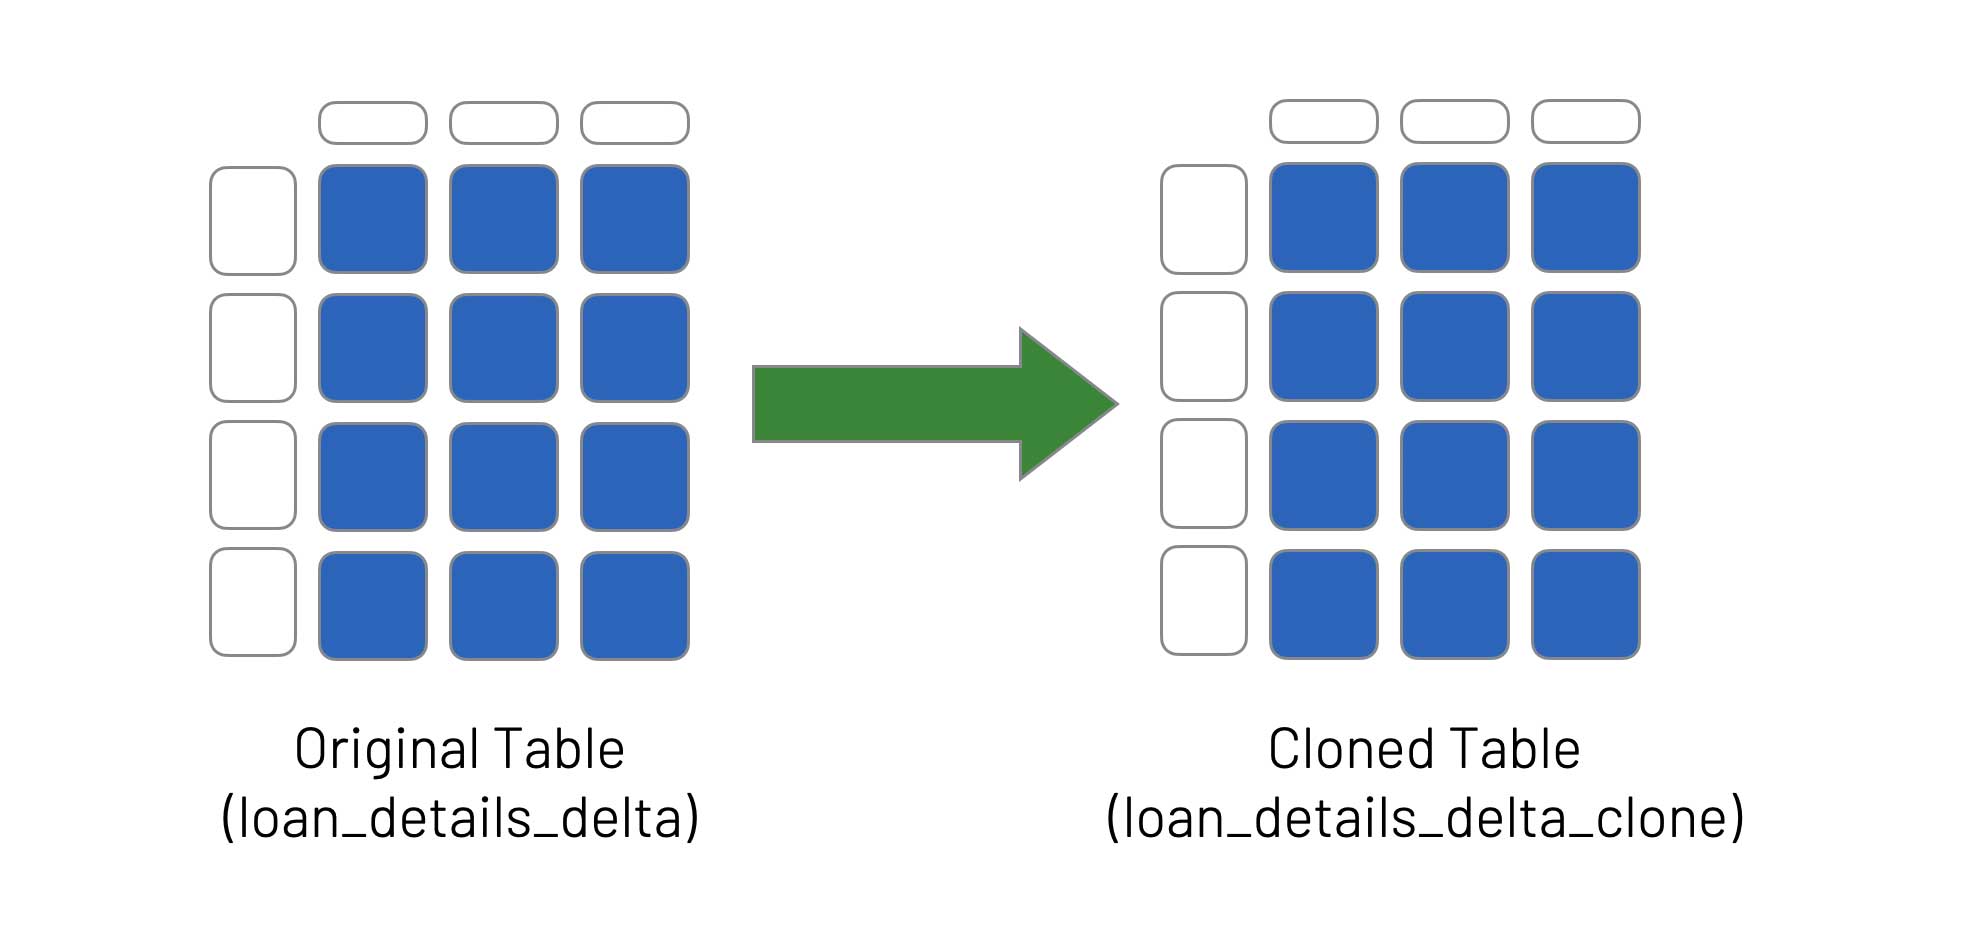
Creating a clone can be done with the following SQL command:
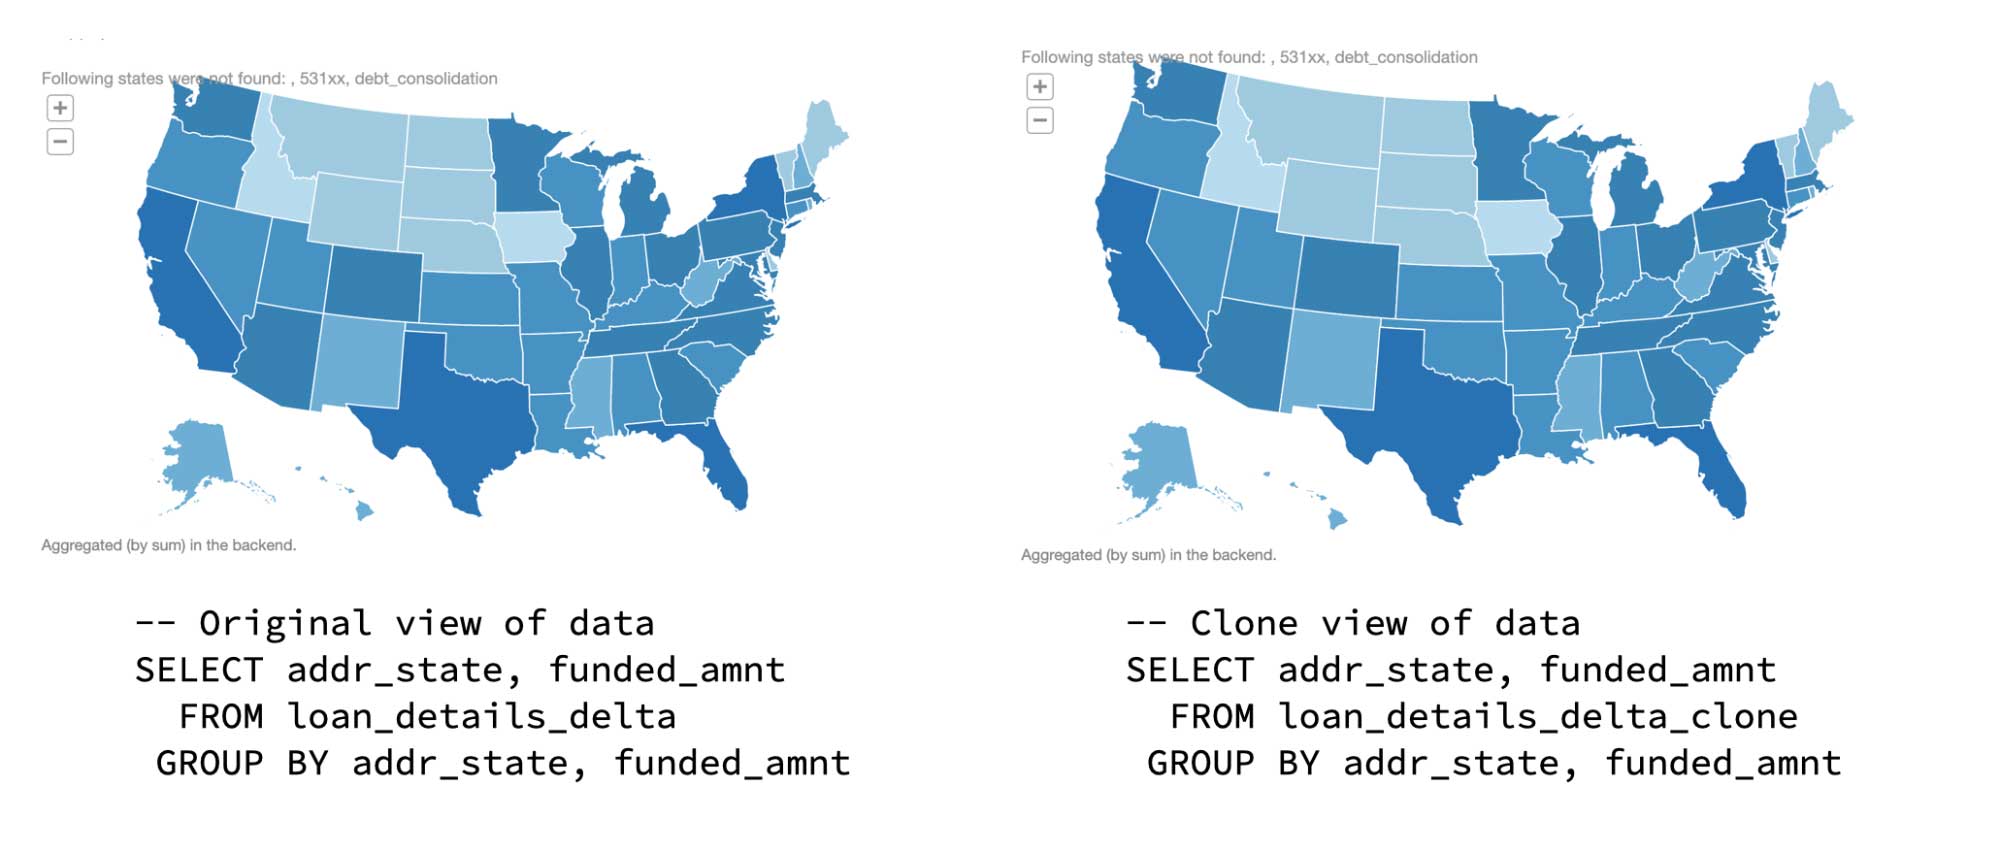
You can query both the original table (loan_details_delta) and the cloned table (loan_details_delta_clone) using the following SQL statements:
The following graphic shows the results using a Databricks notebook map visualization.
An important feature of deep clones is that they allow incremental updates. That is, instead of copying the entire table to ensure consistency between the original and the clone, only rows that contain changes to the data (e.g., where records have been updated, deleted, merged or inserted) will need to be copied and/or modified the next time the table is cloned.
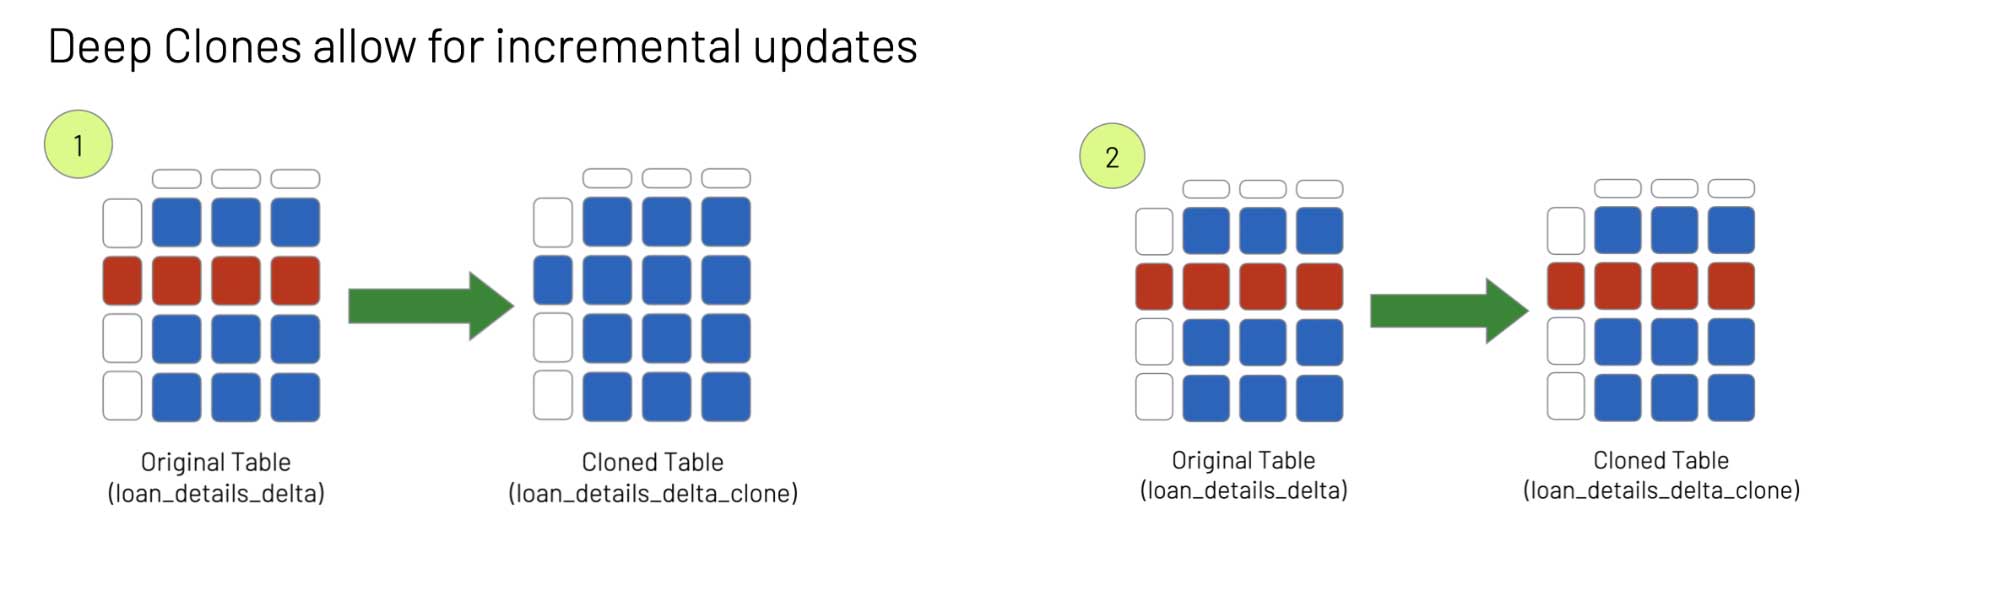
To illustrate how incremental updates work with deep clones, let's delete some rows in our original table (loan_details_delta) using the following SQL statement (step 1 in the above diagram):
At this point, the original table (loan_details_delta) no longer contains rows for Ohio (OH), while the cloned table (loan_details_delta_clone) still contains those rows. To re-sync the two tables, we perform the clone operation again (step 2):
The clone and original tables are now back in sync (this will be readily apparent in the following sections). But instead of copying the entire content of the original table, the rows were deleted incrementally, significantly speeding up the process. The cloned table will only update the rows that were modified in the original table, so in this case, the rows corresponding to Ohio were removed, but all the other rows remained unchanged.
Okay, let’s recover from this disaster of a blog
While disaster recovery by cloning is conceptually straightforward, as any DBA or DevOps engineer will attest, the practical implementation of a disaster recovery solution is far more complex. Many production systems require a two-way disaster recovery process, analogous to an active–active cluster for relational database systems. When the active server (Source) goes offline, the secondary server (Clone) needs to come online for both read and write operations. All subsequent changes to the system (e.g. inserts and modifications to the data) are recorded by the secondary server,which is now the active server in the cluster. Then, once the original server (Source) comes back online, you need to re-sync all the changes performed on Clone back to Source. Upon completion of the re-sync, the Source server becomes active again and the Clone server returns to its secondary state. Because the systems are constantly serving and/or modifying data, it is important that the copies of data synchronize quickly to eliminate data loss
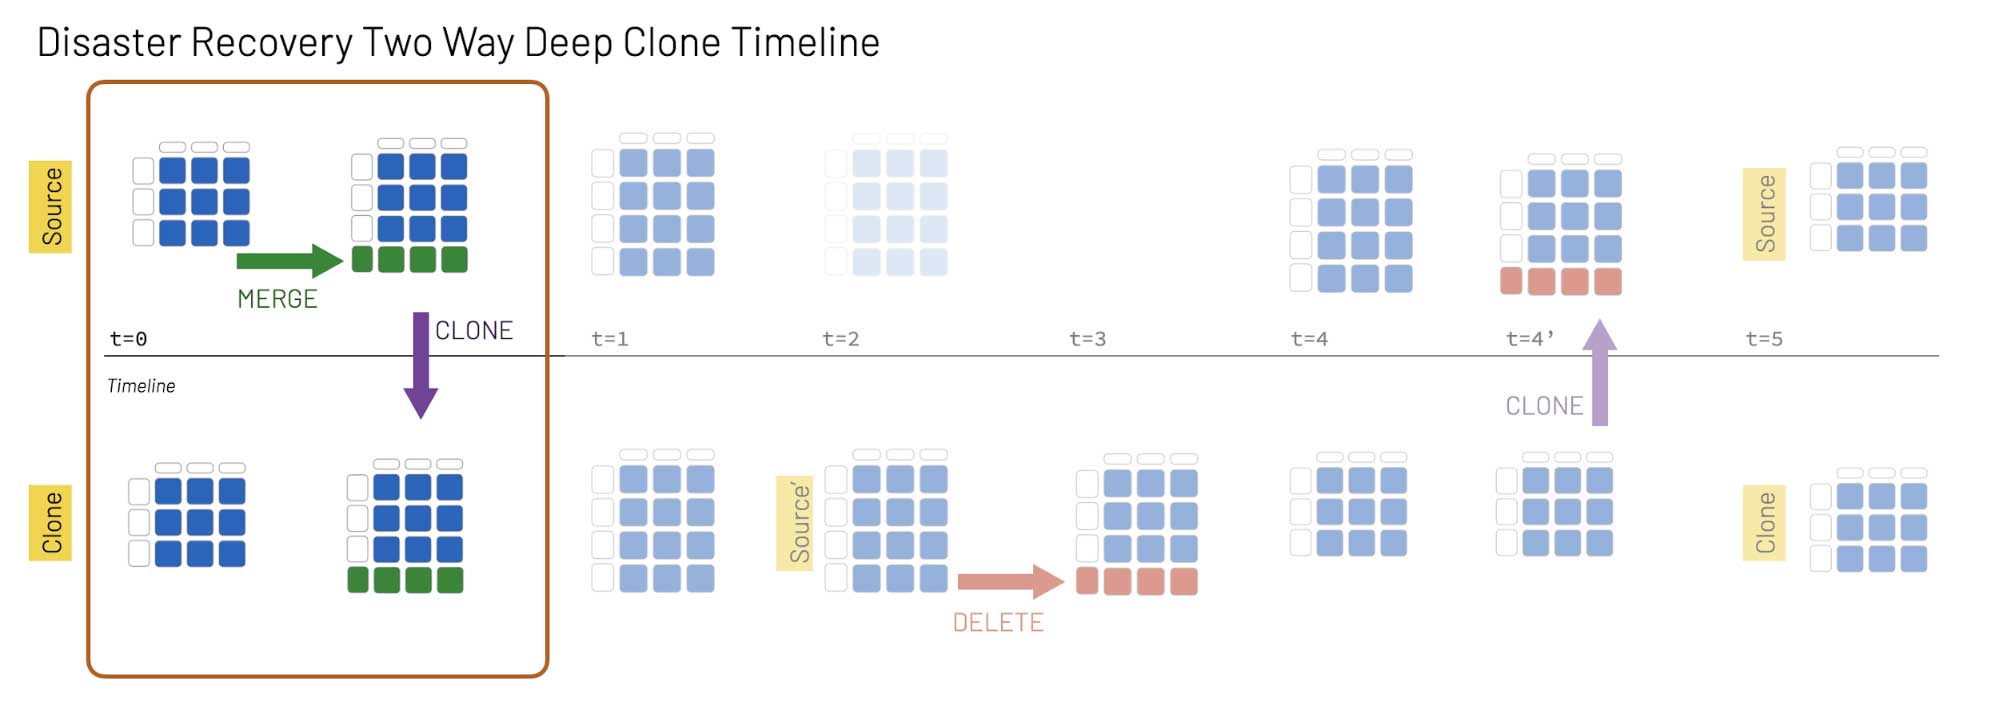
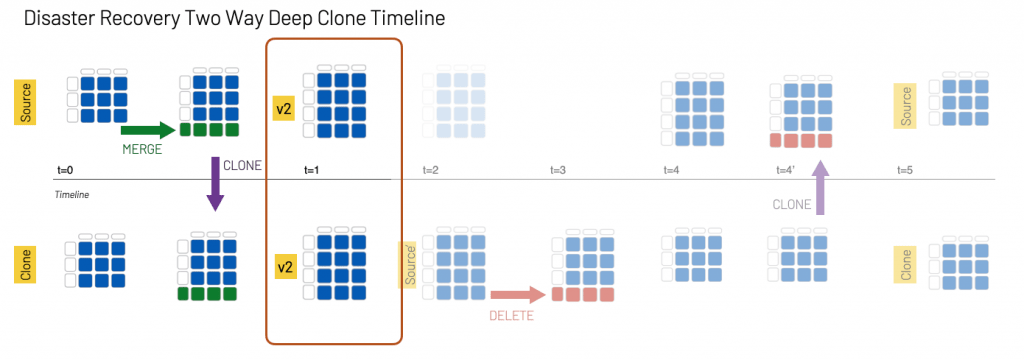
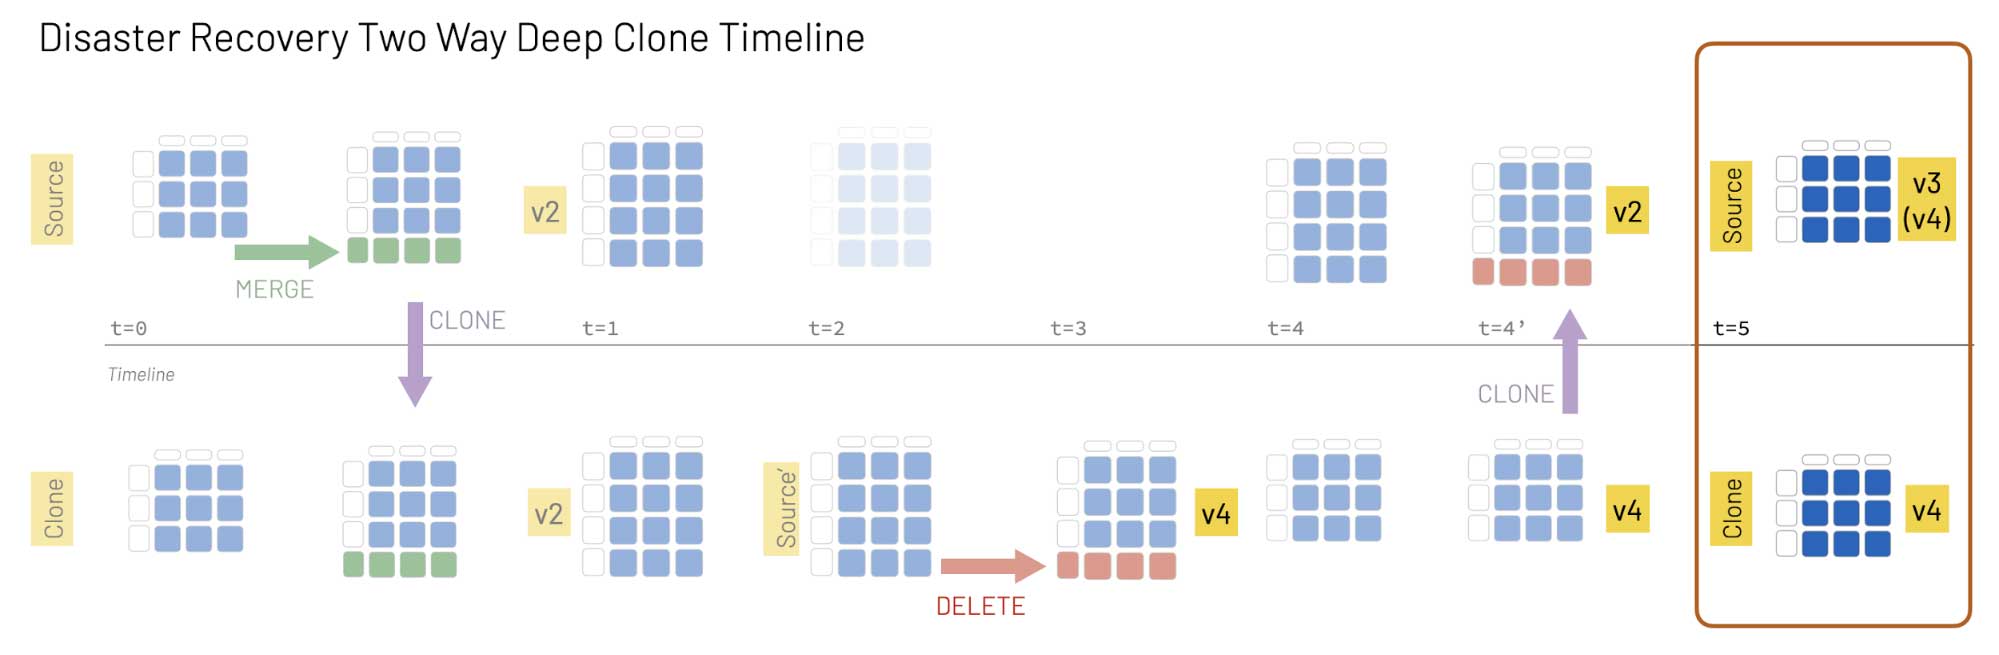
Deep clones make it easy to perform this workflow, even on a multi-region distributed system, as illustrated in the following graphic.
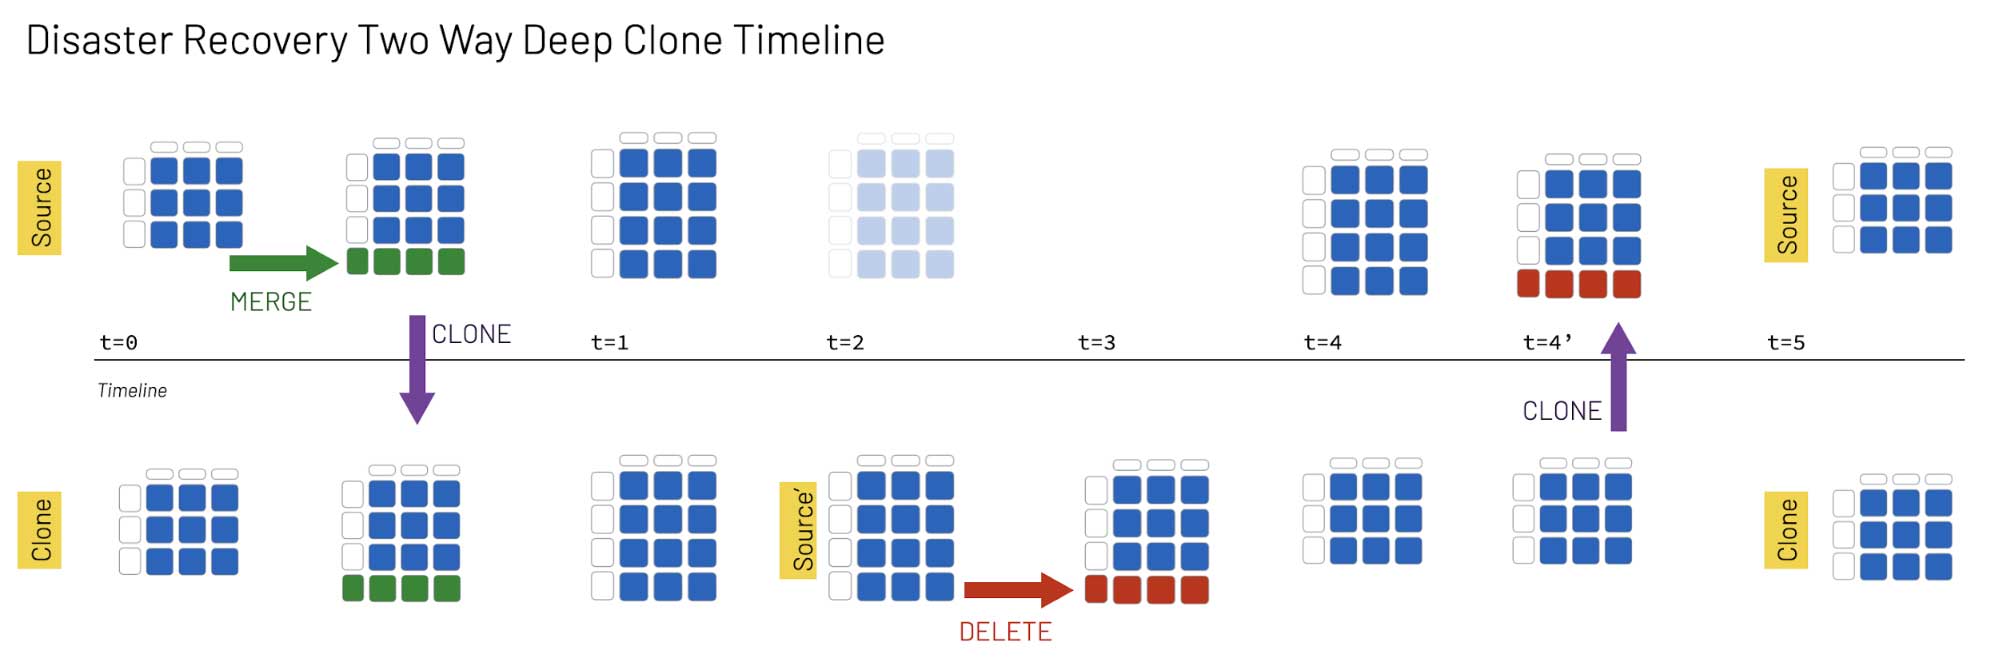
In this example, Source is a table in the active Databricks region and Clone is the table in the secondary region:
- At t0: An insert/update statement (merge) is executed on the Source table, and we then execute a DEEP CLONE to keep the Source and Clone tables in sync.
- At t1: The two tables remain in sync.
- At t2: The Source table is not accessible. The Clone table now becomes Source', which is where all queries and data modifications take place from this timestamp forward.
- At t3: A DELETE statement is executed on Source'.
- At t4: The Source table is accessible now, but Source' and Source are not in sync.
- At t4’: We run a DEEP CLONE to synchronize Source' and Source.
- At t5: Now that the two copies are synchronized, Source resumes the identity of the active table and Source' that of the secondary table, Clone.
Next, we’ll show you how to perform these steps using SQL commands in Databricks. You can also follow along by running the Databricks notebook Using Deep Clone for Disaster Recovery with Delta Lake on Databricks.
Modify the source
We begin by modifying the data in the table in our active region (Source) as part of our normal data processing.
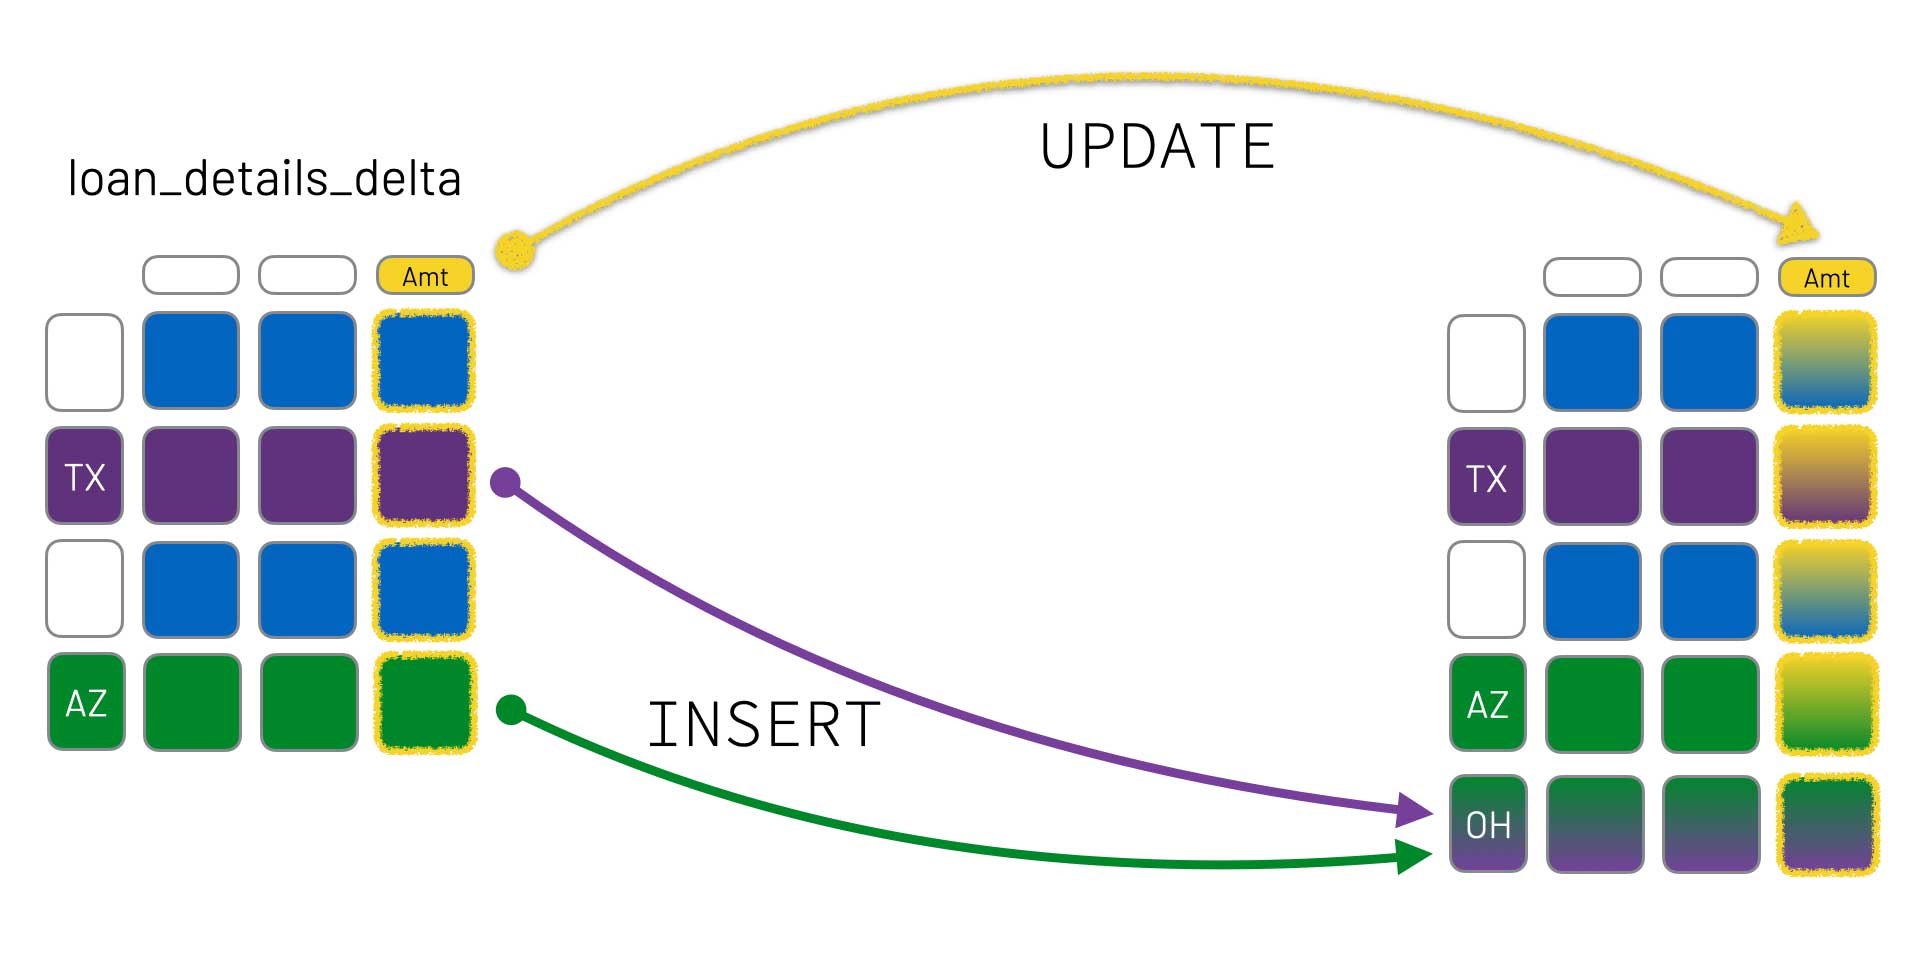
In this case, we’ll implement the merge using an "UPDATE" statement (to update the Amount column) for `TX` and an INSERT statement for `OH` (to insert new rows based on entries from `TX` and `AZ` ).
Check the versions of the source and clone tables
We started this scenario at t0, where the loan_details_delta and loan_details_delta_clone tables were in sync; then we modified the loan_details_delta table. How can we tell if the tables have the same version of the data without querying both and comparing them? With Delta Lake, this information is stored within the transaction log, so the DEEP CLONE statements can automatically determine both the source and clone versions in a single table query.
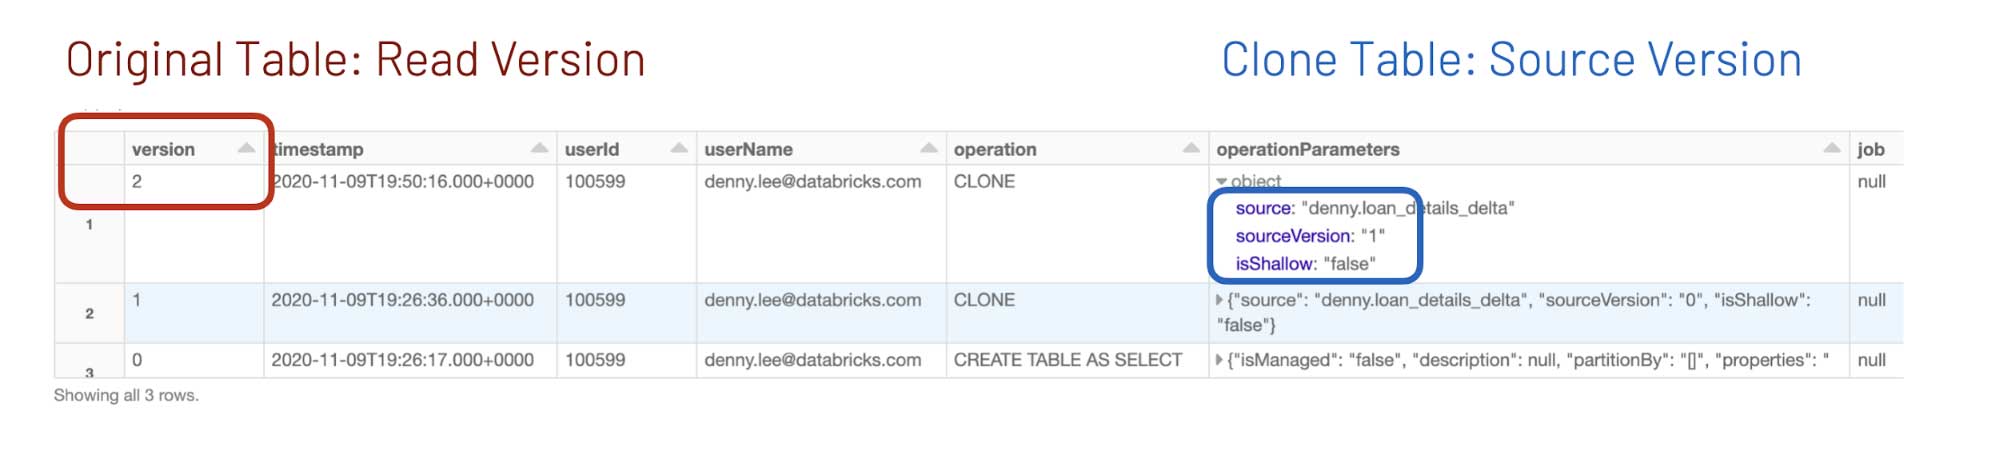
When you execute DESCRIBE HISTORY DeltaTable, you will get something similar to the following screenshot.
Note: original table is loan_details_delta while clone table is loan_details_delta_clone.
Diving deeper into this:
- For the source table, we query the most recent version to determine the table version – here, version 2.
- For the clone table, we query the most recent
operationParameters.sourceVersionto identify whichversionof the source table the clone table has – here, version 1.
As noted, all of this information is stored within the Delta Lake transaction log. You can also use the checkTableVersions() function included in the associated notebook to query the transaction log to verify the versions of the two tables:
For more information on the log, check out Diving into Delta Lake: Unpacking the Transaction Log.
Re-sync the source and clone
As we saw in the preceding section, the source table is now on v2 while the clone table is on v1.
To synchronize the two tables, we run the following command at t1:
Source table is not accessible
At t2, the Source table is not accessible. Whatever causes this – from user error to an entire region going down – you have to admit this is not a great life hack for waking up.
Jokes aside, the reality is that you should always be prepared for a production system to go offline. Fortunately, because of your business continuity plan, you have a secondary clone where you can redirect your services to read and modify your data.
Data correction
With your original Source unavailable, your table in the secondary region (Clone) is now the Source' table.

Some services that do not need to modify data right away can switch to read-only mode while Source is not accessible, but many services and production environments cannot afford such delays. In this case, at t3 we need to modify the Source' data and DELETE some records:
If you review the table history or run checkTableVersions(), (Source') table is now at version 4 after running the DELETE statement:
Because the original Source table is unreachable, its version is reported as None.
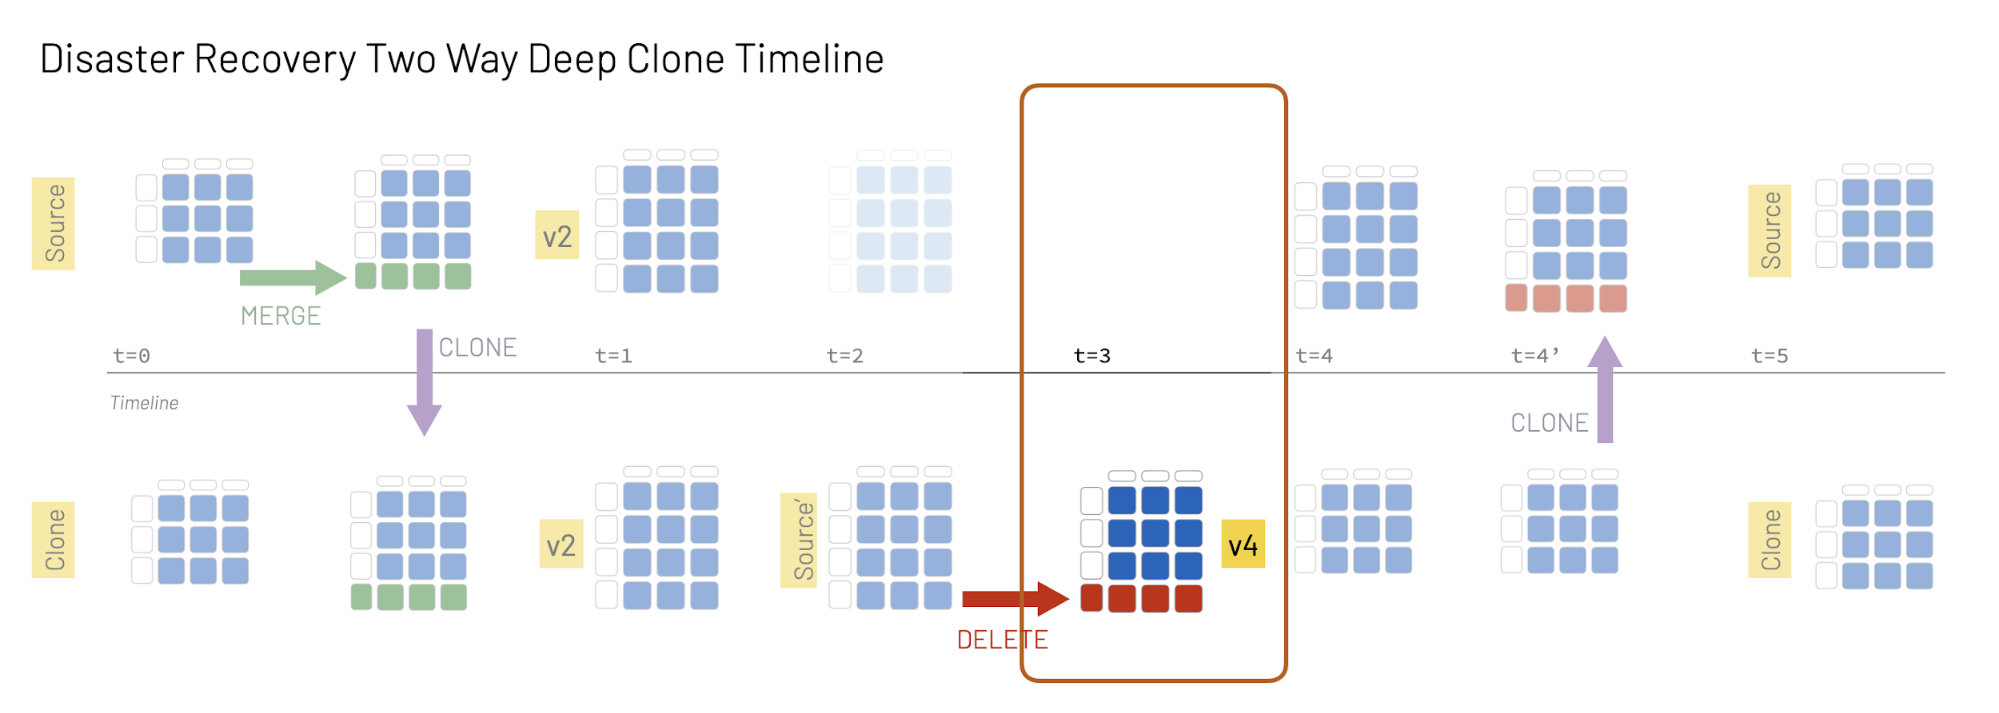
The reason the clone table is on version 4 can be quickly determined by reviewing its history, which shows the three previous CLONE operations and the DELETE command:
DESCRIBE HISTORY loan_details_delta_clone
| version | timestamp | ... | operation | ... |
| 4 | ... | ... | DELETE | ... |
| 3 | ... | ... | CLONE | ... |
| 2 | ... | ... | CLONE | ... |
| 1 | ... | ... | CLONE | ... |
| 0 | ... | ... | CREATE TABLE AS SELECT | ... |
Getting back to the source
Whew, after
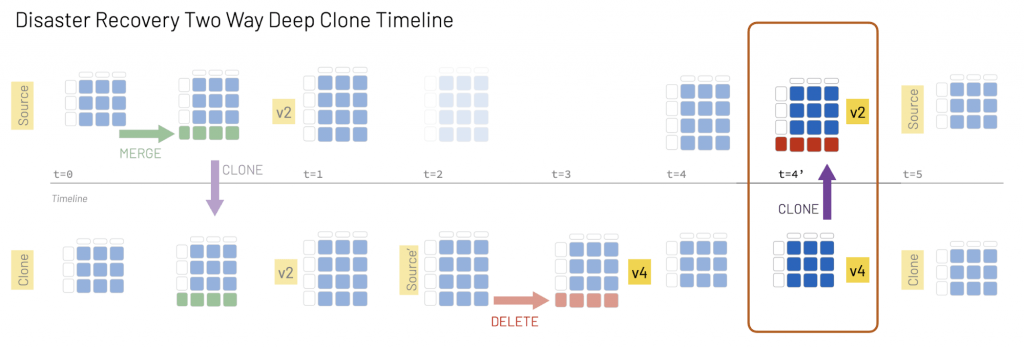
But as we saw in the previous steps, there are now differences between Source and the Source' replica. Fortunately, fixing this problem is easy:
By running a DEEP CLONE to replace the original Source table (loans_details_delta_clone), we can quickly return to the original state.
Now all of our services can point back to the original Source, and the Source' table returns to its Clone (or secondary) state.
Some of you may have noted that the Source table is now version 3 while the Clone table is version 4. This is because the version number is associated with the number of operations performed on the table. In this example, the Source table had fewer operations:
Words of caution
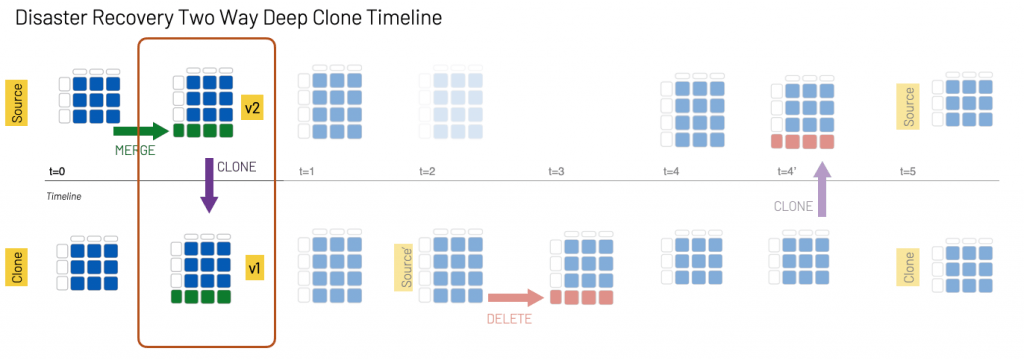
This method for disaster recovery ensures the availability of both reads and writes regardless of outages. However, this comes at the cost of possibly losing intermediate changes. Consider the following scenario.

Notice that there is an update at t=1, which happens between the two CLONE operations. It’s likely that any changes made during this interval will be lost at t=4 when the second CLONE operation occurs. To ensure no changes are lost, you’d have to guarantee that no writes to the Source table occur from t=1 to t=4. This could be challenging to accomplish, considering that an entire region may be misbehaving. That being said, there are many use cases where availability is the more important consideration.
Summary
This article has demonstrated how to perform two-way disaster recovery using the DEEP CLONE feature with Delta Lake on Databricks. Using only SQL statements with Delta Lake, you can significantly simplify and speed up data replication as part of your business continuity plan. For more information on Delta clones, refer to Easily Clone your Delta Lake for Testing, Sharing, and ML Reproducibility. Check out Using Deep Clone for Disaster Recovery with Delta Lake on Databricks to walk through this exercise yourself with Databricks Runtime.
Acknowledgements
We would like to thank Peter Stern, Rachel Head, Ryan Kennedy, Afsana Afzal, Ashley Trainor for their invaluable contributions to this blog.
Get the latest posts in your inbox
Subscribe to our blog and get the latest posts delivered to your inbox.