Build Data and ML Pipelines More Easily With Databricks and Apache Airflow

We are excited to announce a series of enhancements in Apache Airflow’s support for Databricks. These new features make it easy to build robust data and machine learning (ML) pipelines in the popular open-source orchestrator. With the latest enhancements, like new DatabricksSqlOperator, customers can now use Airflow to query and ingest data using standard SQL on Databricks, run analysis and ML tasks on a notebook, trigger Delta Live Tables to transform data in the lakehouse, and more.
Apache Airflow is a popular, extensible platform to programmatically author, schedule and monitor data and machine learning pipelines (known as DAGs in Airflow parlance) using Python. Airflow contains a large number of built-in operators that make it easy to interact with everything from databases to cloud storage. Databricks has supported Airflow since 2017, enabling Airflow users to trigger workflows combining notebooks, JARs and Python scripts on Databricks’ Lakehouse Platform, which scales to the most challenging data and ML workflows on the planet.
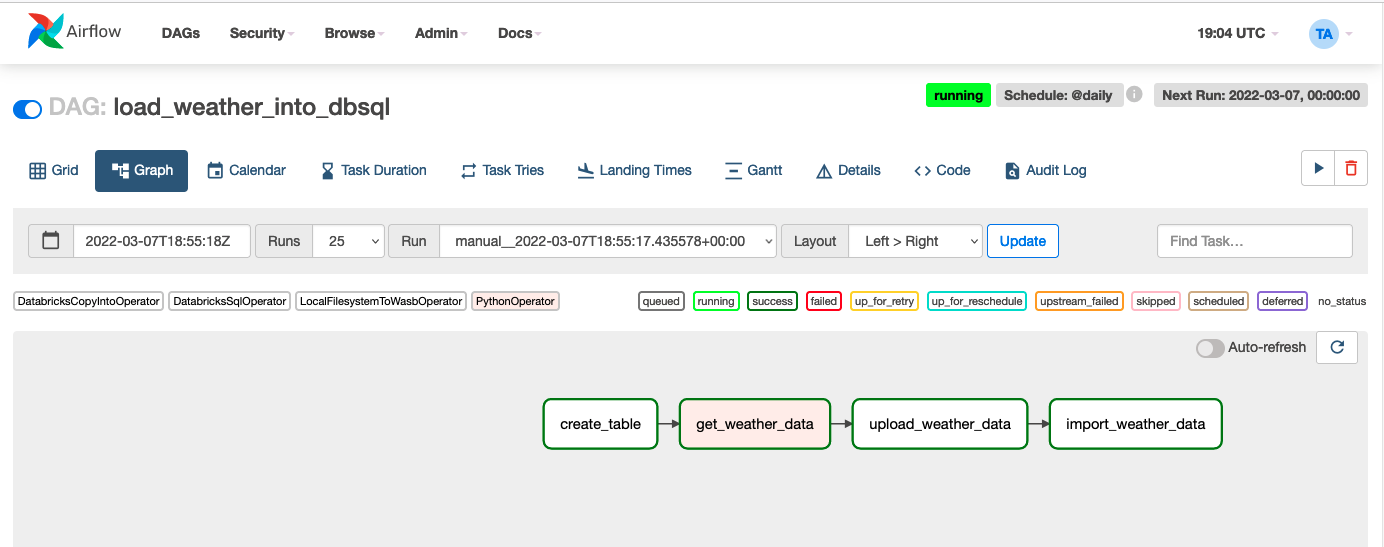
Let’s take a tour of new features via a real-world task: building a simple data pipeline that loads newly-arriving weather data from an API into a Delta Table without using Databricks notebooks to perform that job. For the purposes of this blog post, we are going to do everything on Azure, but the process is almost identical on AWS and GCP. Also, we will perform all steps on a SQL endpoint but the process is quite similar if you prefer to use an all-purpose Databricks cluster instead. The final example DAG will look like this in the Airflow UI:
For the sake of brevity, we will elide some code from this blog post. You can see all the code here.
Install and configure Airflow
This blog post assumes you have an installation of Airflow 2.1.0 or higher and have configured a Databricks connection. Install the latest version of the Databricks provider for Apache Airflow:
Create a table to store weather data
We define the Airflow DAG to run daily. The first task, create_table, runs a SQL statement, which creates a table called airflow_weather in the default schema if the table already does not exist. This task demonstrates the DatabricksSqlOperator which can run arbitrary SQL statements on Databricks compute, including SQL endpoints.
Retrieve weather data from the API and upload to cloud storage
Next, we use the PythonOperator to make a request to the weather API, storing results in a JSON file in a temporary location.
Once we have the weather data locally, we upload it to cloud storage using the LocalFilesystemToWasbOperator since we are using Azure Storage. Of course, Airflow also supports uploading files to Amazon S3 or Google Cloud Storage as well:
Note that the above uses the {{ds}} variable to instruct Airflow to replace the variable with the date of the scheduled task run, giving us consistent, non-conflicting filenames.
Ingest data into a table
Finally, we are ready to import data into a table. To do this, we use the handy DatabricksCopyIntoOperator, which generates a COPY INTO SQL statement. The COPY INTO command is a simple yet powerful way of idempotently ingesting files into a table from cloud storage:
That’s it! We now have a reliable data pipeline that ingests data from an API into a table with just a few lines of code.
But that’s not all …
We are also happy to announce improvements that make integrating Airflow with Databricks a snap.
- The DatabricksSubmitRunOperator has been upgraded to use the latest Jobs API v2.1. With the new API it’s much easier to configure access controls for jobs submitted using DatabricksSubmitRunOperator, so developers or support teams can easily access job UI and logs.
- Airflow can now trigger Delta Live Table pipelines.
- Airflow DAGs can now pass parameters for JAR task types.
- It’s possible to update Databricks Repos to a specific branch or tag, to make sure that jobs are always using the latest version of the code.
- On Azure, it’s possible to use Azure Active Directory tokens instead of personal access tokens (PAT). For example, if Airflow runs on an Azure VM with a Managed Identity, Databricks operators could use managed identity to authenticate to Azure Databricks without need for a PAT token. Learn more about this and other authentication enhancements here.
The future is bright for Airflow users on Databricks
We are excited about these improvements, and are looking forward to seeing what the Airflow community builds with Databricks. We would love to hear your feedback on which features we should add next.
Never miss a Databricks post
What's next?

Data Engineering
August 26, 2024/15 min read


