Deep Learning on Databricks

We are excited to announce the general availability of Graphic Processing Unit (GPU) and deep learning support on Databricks! This blog post will help users get started via a tutorial with helpful tips and resources, aimed at data scientists and engineers who need to run deep learning applications at scale.
What’s new?
Databricks now offers a simple way to leverage GPUs to power image processing, text analysis, and other machine learning tasks. Users can create GPU-enabled clusters with EC2 P2 instance types. Databricks includes pre-installed NVIDIA drivers and libraries, Apache Spark deployments configured for GPUs, and material for getting started with several popular deep learning libraries.
Our previous blog post on GPU Acceleration in Databricks provides more technical details on our GPU offering. It also contains example benchmarks showing how GPUs can be very cost-effective for machine learning, especially for the expensive computations required for deep learning.
This blog post provides a tutorial on how to get started using GPUs and deep learning in Databricks. We will walk through an example task of integrating Spark with TensorFlow in which we will deploy a Deep Neural Network to identify objects and animals in images.
Using deep learning with Apache Spark
Before diving into our tutorial, let’s discuss how users can take advantage of GPU instances and apply deep learning libraries on Databricks. Common workflows include:
- Deploying models at scale: Deploy trained models to make predictions on data stored in Spark RDDs or DataFrames. In this blog post, we will deploy the famous Inception model for computer vision.
- Distributed model training: Use deep learning libraries like TensorFlow on each worker to test different model hyperparameters, speeding up this time-intensive task with Spark. Check out the example in our previous blog post on Deep Learning with Apache Spark and TensorFlow.
- GPU workstation: If your data fit onto a single machine, it can be cost-effective to create a Driver-only cluster (0 Workers) and use deep learning libraries on the GPU-powered driver.
Note that deep learning does not require GPUs. These deep learning libraries will all run on CPUs, especially if used with compute-optimized instance types.
Tutorial: Deploying a deep learning model at scale
We give a brief walkthrough on how to deploy a pre-trained deep learning model on Apache Spark.
Understanding the task
In this example, we take an existing single-machine workflow and modify it to run on top of Apache Spark. We use the “Simple image classification with Inception” example from TensorFlow, which applies the Inception model to predict the contents of a set of images.
For example, given an image like this:

The Inception model will tell us the contents of the image, in this case:
Each of the lines above represents a “synset,” or a set of synonymous terms representing a concept. The weight given to each synset represents a confidence in how applicable the synset is to the image. In this case, “scuba diver” is pretty accurate!
Making predictions with Inception-v3 is expensive: each prediction requires about 4.8 billion operations (Szegedy et al., 2015). Even with smaller datasets, it can be worthwhile to parallelize this computation. We will distribute these costly predictions using Spark.
Creating a GPU-enabled cluster
Users can create a GPU-enabled cluster on Databricks almost like any other cluster. We will point out the key differences.
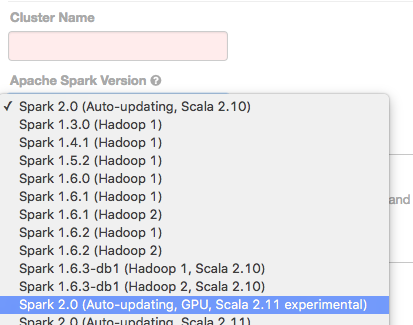
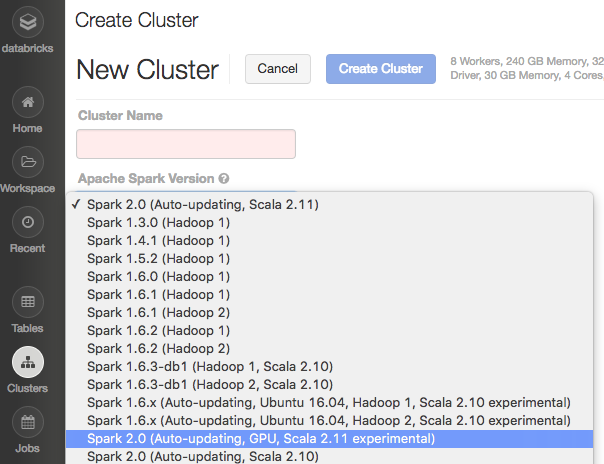
Select an “Apache Spark Version” which is GPU-enabled. Selecting a GPU-enabled version makes sure that the NVIDIA CUDA and cuDNN libraries are pre-installed on your cluster. We avoid installing these libraries on non-GPU clusters since they take extra resources.

By selecting a GPU-enabled Spark version, you agree to the NVIDIA EULA.

At this date, GPU spot instances can be hard to acquire on EC2, so we recommend using on-demand instances for stability.
Select GPU instances types for your cluster Workers and Driver. Databricks currently supports all P2 instances types: p2.xlarge (1 GPU), p2.8xlarge (8 GPUs), and p2.16xlarge (16 GPUs). (UPDATE: P2 Instances are available in three AWS regions: US East (N. Virginia), US West (Oregon), and EU (Ireland). Your Databricks deployment must reside in a supported region to create a GPU-enabled cluster.) Currently, AWS default limits on P2 instance types are 1 instance only, so you may need to request a limit increase from AWS.
Note: Our original blog post discussed G2 instance types, an older EC2 GPU-enabled type. We are releasing P2 instance support instead since P2 offer significantly more memory and GPU cores per dollar.

Finally, P2 instance types do not come with built-in SSD storage, so users must add storage.

You can run this small example using a single p2.xlarge worker and a single EBS volume. For a larger dataset, using more workers would provide near-linear speedups from distributing the computation. More details on creating a cluster, as well as NVIDIA driver and library versions, are given in the Databricks Guide on GPU Clusters.
Installing TensorFlow
Databricks provides Init Scripts for installing deep learning libraries on clusters. Because these libraries are often built from source and need custom configurations, we recommend installing these libraries via customizable scripts. You only need to create the Init Script once, and this creation can be done using any cluster (without GPUs).
Clone the TensorFlow Init Script notebook](https://docs.databricks.com/applications/deep-learning/tensorflow.html#install-tensorflow-using-an-init-script), and modify the cluster name in the script to match your GPU cluster (or the name of a GPU cluster to be created in the future):
Run the notebook to install the Init Script. The next time you create a cluster with this name, it will pick up the Init Script and pre-install TensorFlow on the Spark driver and workers. If you have a cluster by this name already running, then restart it to install TensorFlow.
Deploying a TensorFlow model on Spark
Now that we have a GPU-enabled cluster running with TensorFlow installed, we can deploy a deep learning model. We will cover the key points here.
We begin by downloading the Inception-v3 model, which is hosted by TensorFlow:
We broadcast the Inception model to communicate it efficiently to the workers in our Spark cluster:
If you read the full notebook, you will see we also broadcast other helpful metadata, such as node_lookup information for mapping Inception’s predictions into human-readable results.
We then read a list of image file URLs and parallelize that list in a Spark RDD:
This gives us a distributed set of images to process. The remaining work will be done in a distributed fashion on Spark workers, where each worker will process a subset of these images.
We define a function which processes a single image:
This function does the following:
- Download the image:
image_data = urllib.request.urlopen(img_url, timeout=1.0).read() - Make predictions using TensorFlow:
predictions = sess.run(softmax_tensor, {'DecodeJpeg/contents:0': image_data}) - Convert the results to a human-readable format.
For efficiency, we have batched computation so that TensorFlow handles multiple images at once. The function apply_inference_on_batch(batch) handles an entire batch.
Both of these functions could be used outside of Spark. It can be helpful to develop a deep learning workflow on a single machine for simplicity, before actually parallelizing parts of the workflow.
Here, we do not explicitly tell TensorFlow to use the GPU, so TensorFlow chooses which device to use automatically. When we run this notebook with one p2.xlarge worker and log device usage, TensorFlow uses the GPU for the bulk of the computation.
Finally, we apply the inference functions by mapping them over our distributed set of images:
And that’s it! This workflow provides a nice template from which you can build your customized deep learning + Apache Spark integration. Key points include:
- Try to develop the deep learning logic on a single machine before parallelizing parts of the workflow.
- Know which tasks are efficient to distribute. Prediction (inference) and model tuning are often good candidates.
- Use Spark efficiently: Broadcast big objects like model data, parallelize expensive parts of the workflow, and minimize communication between Spark workers.
Getting started
This tutorial covered only TensorFlow, but we provide material for other popular deep learning libraries as well. Several of these libraries have more complex installation requirements, so the Init Scripts we provide can be very useful. Read the Databricks Guide section on Deep Learning.
Each library page includes an Init Script for installation and a short example of using the library within Databricks. The Databricks Guide also contains a page on creating GPU clusters. Expect more guides in the near future! To get started today, sign-up for a free trial.
Never miss a Databricks post
What's next?

Data Science and ML
October 1, 2024/5 min read
Build Compound AI Systems Faster with Databricks Mosaic AI

Healthcare & Life Sciences
November 14, 2024/2 min read