Serverless Continuous Delivery with Databricks and AWS CodePipeline
Two characteristics commonly mark many companies' success. First, they quickly adapt to new technology. Second, as a result, they gain technological leadership and, in turn, greater market share. Organizations that can quickly turn insight into action maintain huge advantages over their competition. The key to exploiting analytics in an agile and iterative fashion is a robust continuous integration (CI) and continuous delivery (CD) system that streamlines the transition from development to production for complex data applications.
Databricks' interactive workspace serves as an ideal environment for collaborative development and interactive analysis. The platform supports all the necessary features to make the creation of a continuous delivery pipeline not only possible but simple. In this blog, we will walk through how to leverage Databricks along with AWS CodePipeline to deliver a full end-to-end pipeline with serverless CI/CD.
Four Steps of the Pipeline
Let’s take a simple scenario. First, a developer working in a notebook makes a commit to the development branch in Github. This automatically triggers CodePipeline to execute four stages in sequence:
- Source - Pull the branch from Github
- Staging - Jobs API will launch integration testing job(s) in Databricks*
- Approval - QA will be notified to review via email
- Deployment - Upon successful review, notebooks will be deployed into Databricks using the Workspace API, while libraries are uploaded to S3 for production use
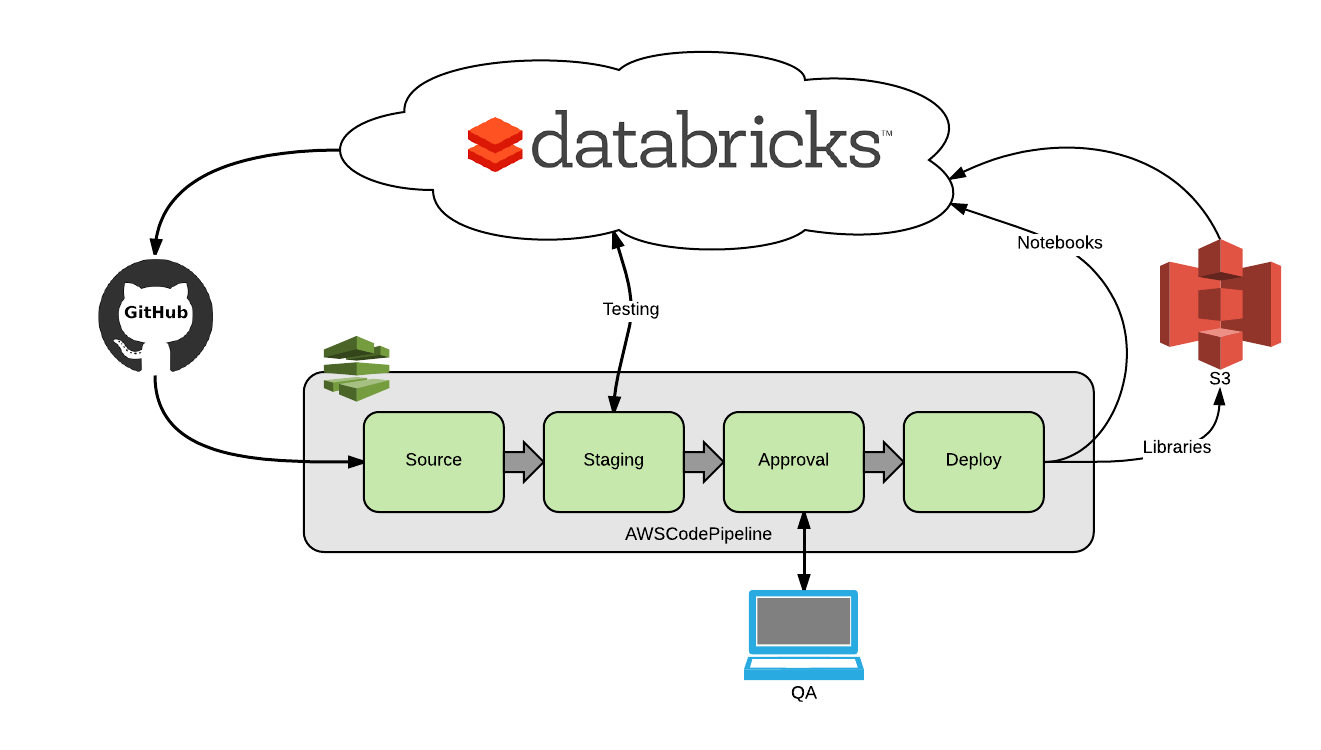
Since this example consists of a user committing a Databricks notebook, a build stage isn’t included. However, CodePipeline supports some of the most popular build systems (Jenkins, Solano, CodeBuild) and their implementation is well documented.
Source
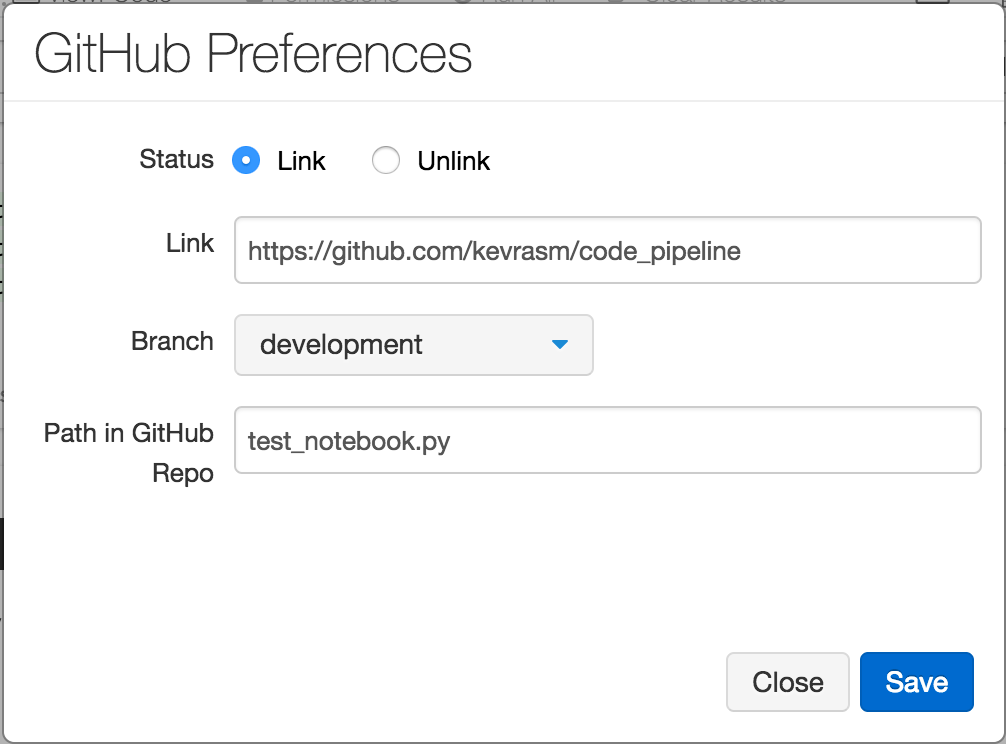
The first step in configuring our pipeline is to specify the source. CodePipeline currently supports 3 sources: Github, S3, and CodeCommit. Since Databricks provides built-in integration to Github, it makes the automation of CodePipeline seamless. The same token used to link Databricks to Github can also be used to link CodePipeline to a specific branch in Github. Data Scientists and engineers can commit Notebooks into GitHub directly from the Databricks workspace. CodePipeline continuously monitors the branch, so that when a Notebook is committed it will automatically trigger our pipeline to run.
Stage
At this point, the code has been committed and it needs to go through integration testing. A common way to test an Apache Spark job is by running it against a known dataset and comparing the output. A best practice is to set up variables in your notebook that are configured based on your run mode (i.e., prod, test, etc.) and can be set through Databricks widgets. For example, I set up a notebook for test run mode with a source, target, and mode widgets.
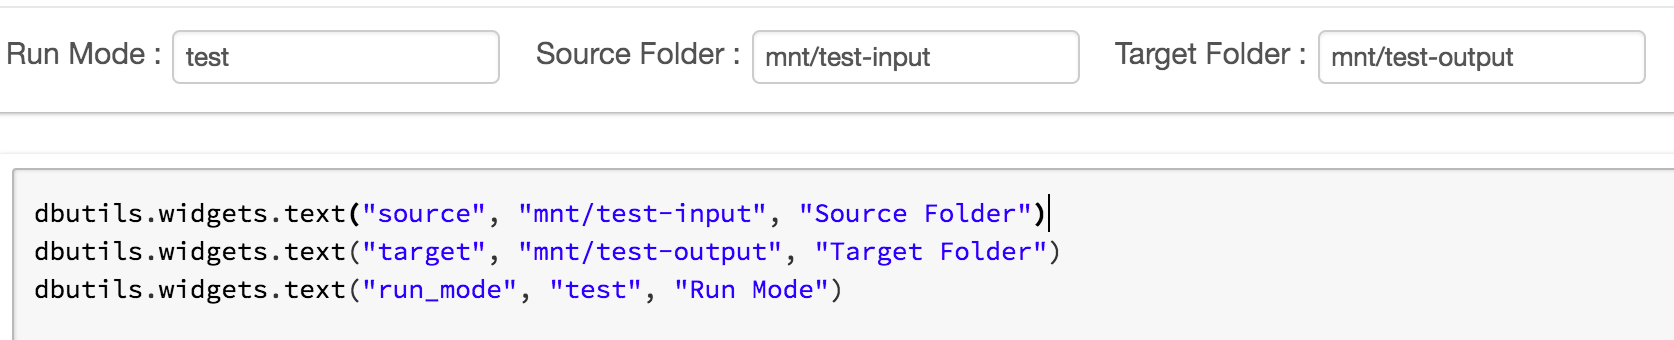
When the notebook is run for testing, the source is defined as a test dataset in S3, and the target is a test output location in S3. When the mode is set to ‘test,’ the notebook returns the S3 location where the data was written, which can be captured by a Databricks Utils Notebook run command. This return value is then passed into a DataFrame compare function to provide Pass/Fail status.
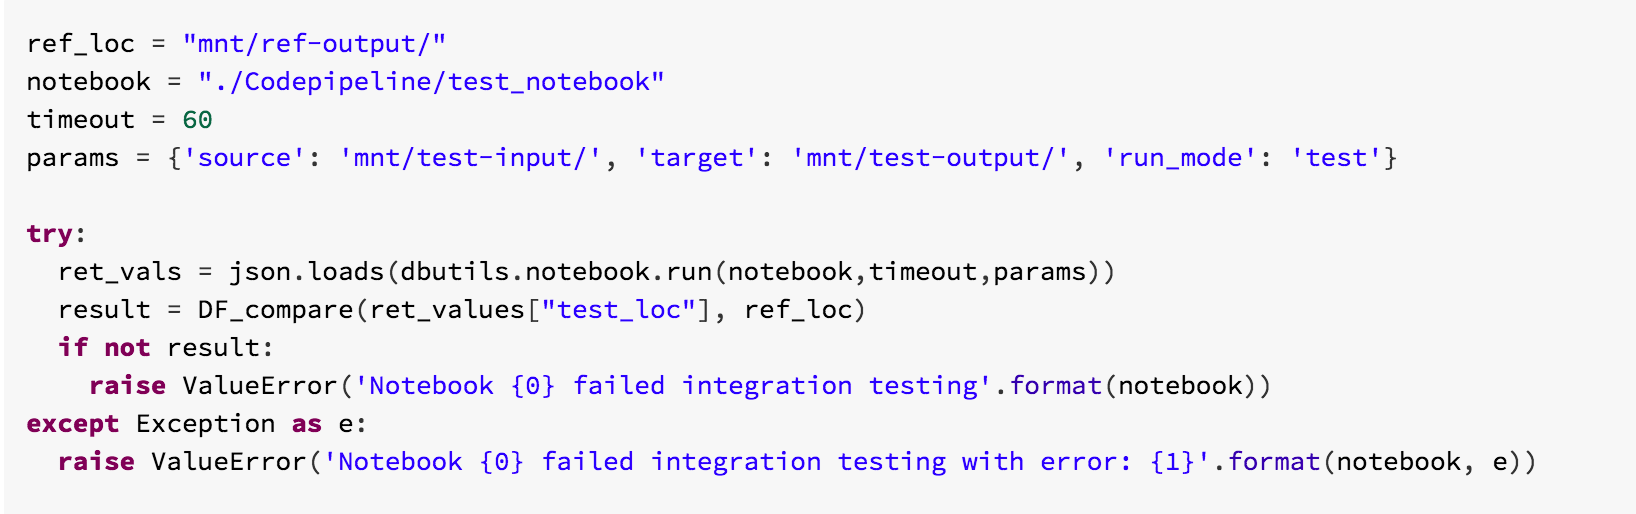
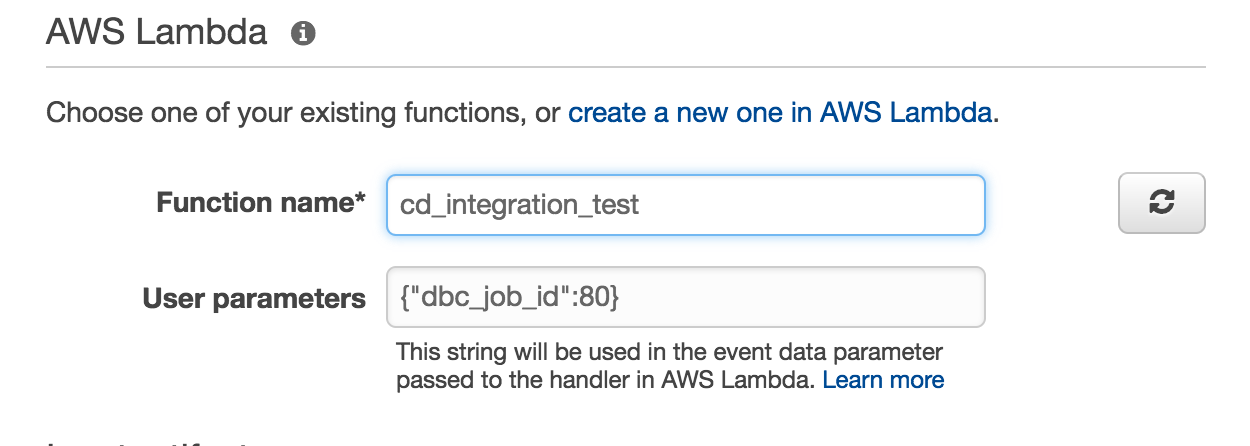
This may sound complicated, but the Jobs API makes it really easy to call Jobs and pass in parameters. This stage can actually be executed using only 3 API calls: runs now, runs list, and runs get. Run now requires a Job ID and that’s it (job parameters optional). Once the job is running it can be polled with ‘runs get.' Which brings me to the next point — this stage is executed via invoking AWS Lambda functions (I said this was serverless, right?).
The only hurdle with this approach is dealing with Lambda’s 300 second duration limit, but fortunately CodePipeline has already resolved this for us with Continuation Tokens. A Lambda function can return any of three statuses back to CodePipeline - Success, Failure, or Continuation. When a continuation token is returned back to CodePipeline, it invokes the Lambda function again and includes an indicator that the function was re-invoked.
This just needs to be monitored so we don’t relaunch an already running job.
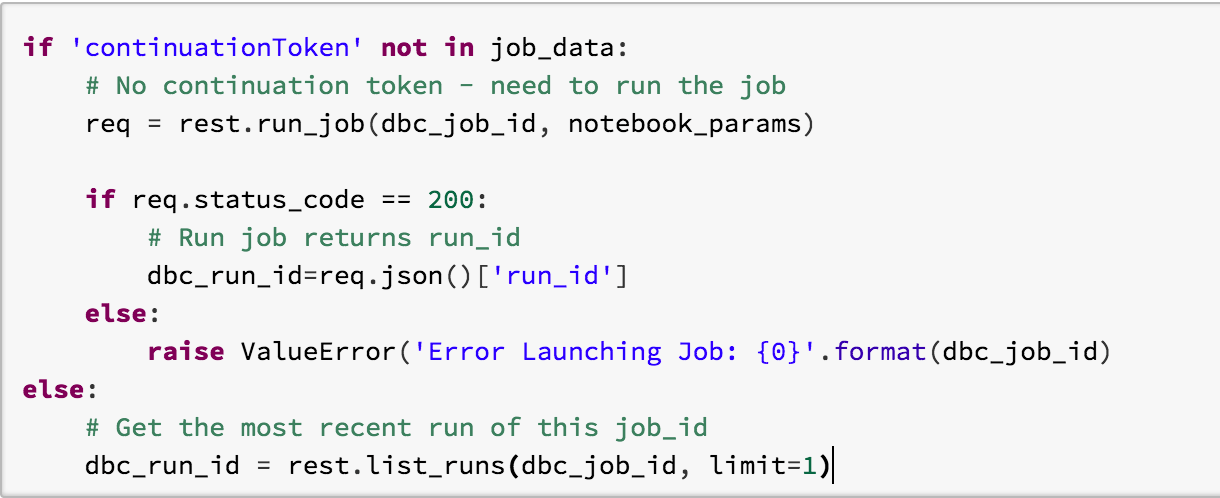
Through the use of continuation tokens, a developer is no longer bound by the 300 second limit and can poll a job indefinitely. However, it’s still best to set a Timeout for the job.
Approval
CodePipeline provides an Approval stage that will send a notification to whomever needs to sign off on the commit before it continues through the pipeline. It allows the developer to send URL links to what needs to be reviewed. So, along with location of the Github repo, you could also include the URL to the job output within Databricks.
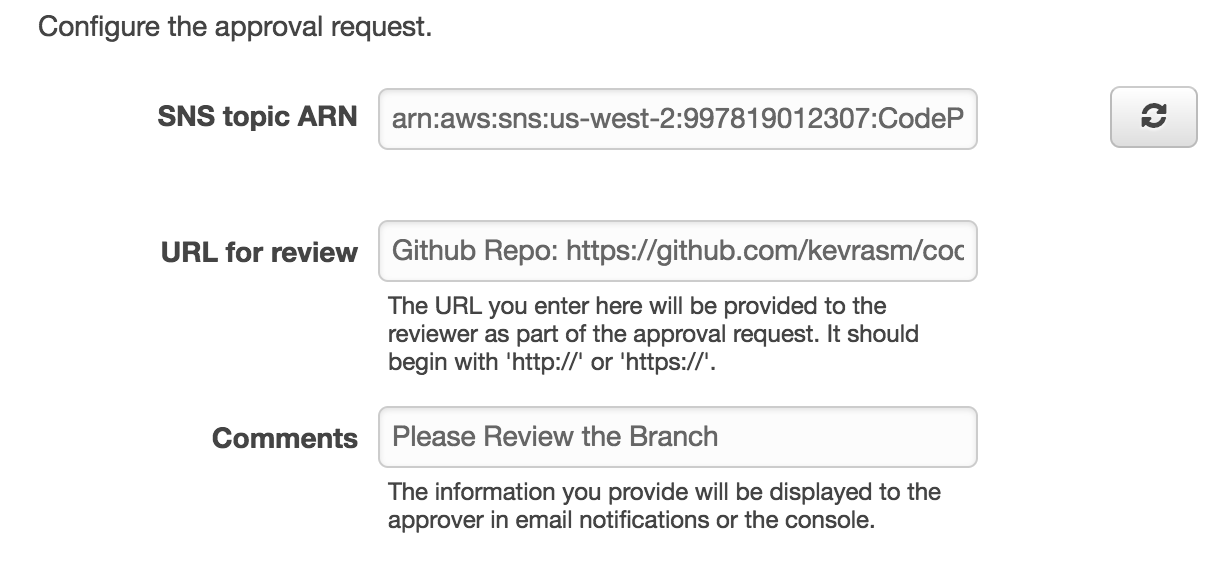
This is tied to an SNS topic, so you’ll need to first create a subscription in SNS. This essentially just assigns who to send the email to. The pipeline only reaches the approval stage if the testing job passed, so in order to get immediate feedback on failure, it’s best to set alerts on failure for the job within Databricks.
Deploy
Now that the code has been approved, it needs to be deployed. Like integration testing, deployment will be executed by invoking a Lambda function. In CodePipeline, the source code is stored in S3 as a zipped artifact with the location passed from stage to stage. So, the first step is to extract the files. Recognizing the memory limits of lambda and knowing that most repos will consist of more than just notebooks and libraries, it’s best to read through the files’ names and only extract files that match the correct extension and file path.
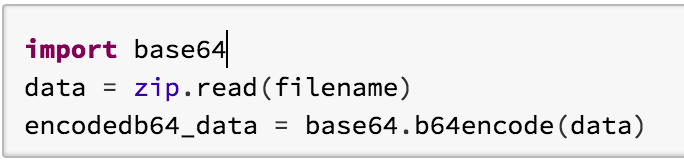
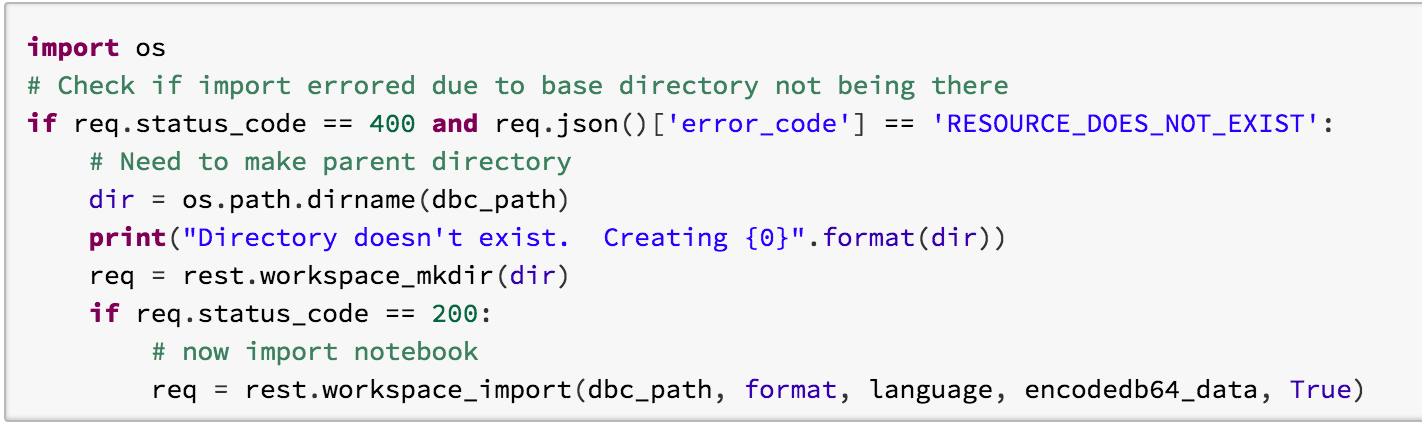
Notebooks will get deployed into a specified Databricks workspace using the Workspace API. The Workspace API provides basic file system functionality to do things like import/export notebooks, create directories, etc. This can be done with two API calls: Import and Mkdirs. There are a couple of things to take note of when importing notebooks. First, the content of the notebook is transmitted via base64 encoding, so the data file needs to be encoded:
Second, the import will fail if the base directory doesn’t already exist. It will return an error response of 400 and an error message stating ‘RESOURCE_DOES_NOT_EXIST’. Just create the directory and import again.
In addition to importing libraries into the workspace, Databricks also supports calling libraries directly from S3. This provides additional options for teams that prefer to work within S3. For example, as we’re reading through file extensions, one could write .jar and .egg files to a designated S3 bucket and key while notebooks are imported into the workspace. S3 versioning should be turned on for this bucket.
Conclusion
In order to keep pace with customers’ evolving needs, companies need to employ an agile development process that can provide value rapidly. A robust Continuous Delivery pipeline can reduce delivery times while keeping consumers happy. As demonstrated above, Databricks provides all the tools necessary to integrate with CodePipeline to build a robust, serverless, and cost effective continuous delivery model.
To learn more Databricks, start a free trial today.
Get the latest posts in your inbox
Subscribe to our blog and get the latest posts delivered to your inbox.