Cybersecurity in the Era of Multiple Clouds and Regions

In 2021, more than three quarters of all enterprises have infrastructure in multiple clouds. This trend shows no signs of slowdown with hybrid work-from-home policies and the need for enterprises to diversify their risk of over-dependence on a single cloud provider (eg. OSFI Third Party Risk Management Guideline). Even within a single cloud provider, most enterprises intentionally have infrastructure in multiple regions for disaster recovery and data sovereignty compliance.
If you are an information security leader, how are you monitoring and securing infrastructure in multiple clouds and regions? If you are an engineering or product leader building security products and services, how are you supporting multiple clouds and regions without adding complexity to your codebase and development process? If you are a managed security service provider, how do you gain economies of scale, while respecting various customer data segregation policies and boundaries?
One option is to use a SIEM solution in each cloud and region. Another option is to consolidate all of the logs into a single SIEM solution in one cloud and one region. The first option has the advantage of respecting data sovereignty regulations, but has the following challenges:
- The SIEM solution must be supported in each cloud provider – few SIEMs are truly multi-cloud in this manner.
- Your devops team has to manage many instances of the SIEM solution – one in each cloud and region. If you are using different cloud-native SIEM solutions in the different cloud environments, the devops effort becomes even more challenging!
The second option simplifies the devops effort, but will have a different set of challenges:
- Security logs are voluminous (eg. AWS cloudtrails) and consolidating logs to one location will incur high egress costs (see each cloud vendor data transfer pricing)
- The log data consolidation will potentially violate data sovereignty regulations for some regions.
There must be a better way.
Multi-cloud, multi-region cybersecurity lakehouses

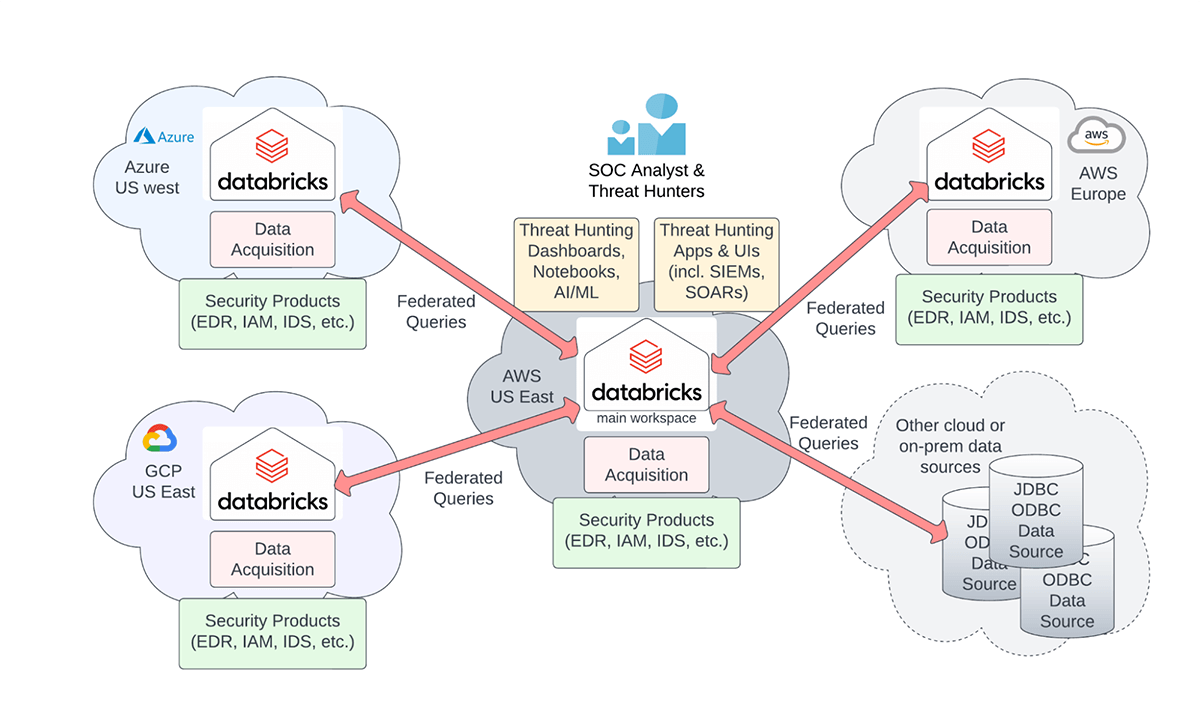
Cybersecurity architecture for multiple clouds and regions.
The Databricks Lakehouse platform can be used to build a federated cybersecurity lakehouse that lets you:
- Keep the security data in the cloud and region of origin to limit egress cost while giving SOC analysts and threat hunters a single unified view to all of your organization's data
- Minimize devops effort: Use managed Databricks services instead of different security solutions in each cloud
- Respect data sovereignty regulations and data residency requirements: Databricks provides fine grained access control to federated data tables and fields
- Perform federated threat detection or hunting queries over all the data in each cloud and region from a single interface – egress cost will be incurred for query results only
- Store your data in an open and highly performant format on low-cost cloud object storage (AWS S3, Azure ADLS, Google Cloud Storage)
This blog will show you how.
Overview of setting up federated lakehouses
In each cloud and region, a system administrator will need to:
- Provision one Databricks workspace
- Configure your existing security data collection infrastructure to export the data to either cloud storage or a message bus system like kafka or event hubs.
- Ingest the logs into the Databricks workspace. Use Databricks data pipelines to create tables from the raw security files.
- [Optional] Perform transformations using Delta Live Tables or the extract-load-transform (ELT) tool of your choice. This includes any automated threat detection logic to create alerts or hits tables.
- Configure the access control policies for the tables to be federated.
- Create the service account/principal and the associated personal access token (PAT) to be used for the federated queries.
A single Databricks workspace (henceforth the "main" workspace) is used to configure the security apps and tools for threat hunting and/or incident response. In this main workspace, the system administrator will need to:
- Create the external JDBC/ODBC tables to each remote table to be federated
- Create any desired views over the (external) JDBC tables
- Configure the access control policies for the JDBC tables and associated views
Once the system administrator has set up the JDBC tables and associated views in the main Databricks workspace, a databricks user with the appropriate permissions will be able to to query the federated data using Databricks SQL, notebooks, dashboards, JDBC/ODBC API, and other APIs.
Let's dive into the critical details with an example.
Creating the JDBC tables
Suppose we have three workspaces in three cloud environments or regions to be federated:
- demo-aws-useast.databricks.com (main or driver workspace)
- demo-aws-europe.databricks.com
- demo-azure.databricks.net.
Further assume you have already run the 02_ioc_matching notebook in the IOC matching solution accelerator to create and populate the iochits table in each of the three workspaces. For this example, you want to federate the iochits table.
You will need the JDBC URL and personal access token (PAT) for the two remote workspaces to configure the JDBC tables. The rest of the steps are to be performed in the main workspace using a cluster with the JDBC driver installed (installation instructions are in the provided notebook). Note that the best practice is to store the PAT in the Databricks secrets vault. After collecting this information, you can create the JDBC tables using the following commands:
Creating a union-all view
After you have created the JDBC tables, create a union-all view over the JDBC and local tables. Why do we want to create a union-all view? The reason is that it abstracts out the underlying JDBC tables and presents a simpler user interface for the average threat analyst who really does not care that the tables are federated.
Note that you could include an identifier string literal (e.g. 'aws_europe', 'azure' etc.) as a source table identifier column in the view definition that would show the source table of each row in the view.
Sanity check using sequential queries
It is a good idea to check if your JDBC tables are working. Run the following queries sequentially on each of the local and JDBC tables as a sanity check. Note the running time.
Federated concurrent queries
This is the highpoint of our endeavors. With the federated union-all view, any human analyst or any threat hunting application only needs to query the federated view in order to hunt through all the logs in multiple clouds and multiple regions! The federated query will be farmed out to the local and remote workspaces automatically and executed concurrently. Run the following query and note the running time. You should observe that the running time is roughly a third of what you observed with running the three queries sequentially.
Moreover, predicates or filters on the underlying tables will get pushed down to the remote workspaces, so there is no egress of data, only egress of the filtered results. You can verify this behavior by examining the query plan using the explain command.
Observe that the predicates have been pushed down into the Scan JDBCRelation operator.
Data governance for data sovereignty
A critical aspect of this multi-cloud, multi-region cybersecurity lakehouse is the ability to enforce data sovereignty rules on the federated workspaces. In fact, there are several levels where you have the ability to enforce access privileges:
- access privileges of the source tables or views at the workspaces to be federated
- access privileges of the JDBC table at the main workspace
- access privileges of the union-all view at the main workspace
Access privileges are governed using Databricks object privileges and can be configured via SQL grant statements. Here are a few recommended tips:
- Create separate user or service accounts in the workspaces to be federated. You can then control the access privilege to tables and views using that account. See Databricks documentation on object privileges.
- Ensure that the JDBC URL is tied to a high-concurrency (HC) cluster. Note that the JDBC URL is tied to both the user/service account associated with the PAT and to the cluster. The privileges of the JDBC connection will be tied to the account associated with the PAT.
- To enforce access privileges at the main workspace, you must ensure that users are only allowed to use a high-concurrency (HC) cluster to query the views and JDBC tables. See Databricks documentation on cluster policies.
- Use views at the source/federated workspaces to control or mask access to columns with protected information. The JDBC tables at the main workspace will then be created against the views. See Databricks documentation on dynamic view functions.
You can try this now!
You can try out this multi-cloud, multi-region solution using the notebooks provided as part of the IOC matching solution accelerator. Download the notebooks into your Databricks workspaces. We would love to work on a Proof-of-Concept with you, so contact us at [email protected] if you have any questions.
Never miss a Databricks post
What's next?

Product
November 21, 2024/3 min read
How to present and share your Notebook insights in AI/BI Dashboards

Product
December 10, 2024/7 min read